Unique Home Remodeling Projects For The Winter Months

Most Renovation and Design Firms Are Bullish

At least two-thirds of firms in the home remodeling and design industry entered 2018 expecting a good year for business, according to new research. However, firms are split on the future of the national economy, and two industry segments — architects and design-build — expect revenue growth to slow to a less rapid but still healthy pace

Most firms across industry groups are optimistic. tracks seven industry groups: architects, interior designers, design-build firms, building and renovation specialists, landscaping and outdoor specialists, decorating specialists, and building firms that include general contractors, remodelers and builders.

The majority of companies across all the groups rated their overall business outlook for 2018 as good (medium green) or very good (darkest green). Companies in the construction and outdoor industry sectors are particularly optimistic. For example, 42 percent of design-build firms rated their overall business outlook as “very good,” and 46 percent rated it as “good.”

High expectations for both revenues and profits. The majority of firms in all the industry sectors that tracks reported that they expect growth in both revenue and profits this year.

Among all the industry groups, architects were the most cautious about potential profit changes; this group had the lowest share of firms predicting increases (56 percent). Eleven percent of architecture firms said they expect profit decreases, the highest percentage of all the industry groups.


How Renovation and Design Businesses Fared

The numbers are in, and 2017 was another strong year for home renovation and decorating firms in the U.S., a new report from shows. Revenues (total sales) grew for at least three out of five firms across industry sectors, while profits grew for half or more across industry sectors.

Revenue grew for most. The 2018 State of the Industry study surveyed architects, interior designers, design-build firms, and building companies such as general contractors, remodelers and builders, as well as three types of specialty firms: building and renovation specialties, including pros such as carpenters and cabinet installers; landscaping and outdoor specialties, such as landscape architects and pavers; and decorating specialties, such as decorators and providers of window coverings

As this chart shows, four groups — architects, design-build firms, landscaping and outdoor specialty firms, and the building and renovation sector that includes general contractors, remodelers and builders — reported an increase in revenue growth during 2017.

This means that the pace of sales growth increased for these four industry sectors. For instance, the average revenue growth rate for architects was 8.3 percent in 2017, a rise from only 6.7 percent in 2016. Firms that focus on residential construction did particularly well in terms of revenue growth.

“The good news is that the demand for home remodeling far exceeds the prerecession levels in most parts of the country, driven by aging homes, aging population and recovered home equity,”


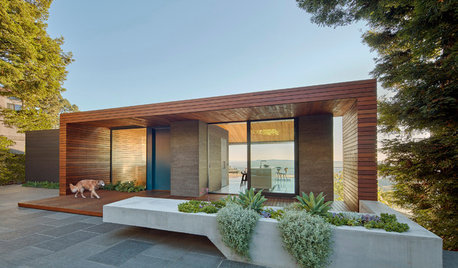
How to Use Texture to Zone Your Open-Plan Home

When you’re designing an open-plan room, it’s a good idea to think about how you’ll separate each zone. By being creative with the surfaces you use to decorate the walls, you can divide your living, dining and kitchen areas more effectively, adding warmth, interest and personality.

Opt for modern paneling. In this open-plan kitchen and dining room, the eating area is zoned with Valchromat, a manufactured material of recycled wood fibers that’s colored throughout. Valchromat is eco-friendly, strong, and comes in rich and vibrant hues, so it’s a great choice for paneling a room.

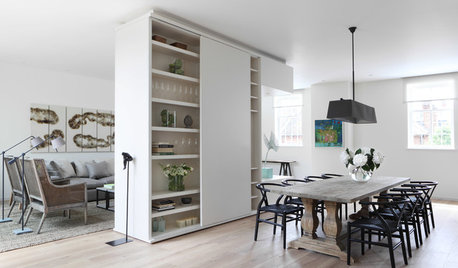
Add shelving. The texture on the wall of this living space was created simply by installing a wood shelving unit. The grid adds a tactile element to the plain white wall, giving the seating area a cozy feel. Its position is pretty clever too — it overhangs slightly to signify that this area is a separate zone.

Weave in bare brick. A good way to zone an area is to leave a wall exposed. This works particularly well in a living room, as a wall of textured brick or stone gives a snug feel to the space. Brickwork frames this wood-burning stove to add character and warmth to the seating spot and to separate it from the kitchen and dining zones.

Mix things up. The designers of this open-plan house used a number of materials to create an interesting layout of different areas. The sleek white paint in the kitchen contrasts with the cozy expanse of botanical wallpaper in the dining zone. The living area is intimate and calm, with a wall of exposed brick, and to the right is a child’s playroom, separated by a rope screen.


How to Divide an Open-Plan Space With a Half Wall

Is your preference for an open plan, but not quite? If you’re in favor of its spacious feel, extra light and views through to the outside but wonder how to subdivide the area, that’s where the half wall, or pony wall, can come in

As the following photos show, a horizontal or vertical mini wall can separate without enclosing to satisfy both a desire for a contemporary layout and a need for cocooning areas, a little privacy and a place to position furniture or hang things.

Draw a line. In this open-plan space, a half wall separates the sitting and dining areas so that the recliners feel anchored in the large space and the dining area feels distinct. The wall also creates a spot to display favorite items.

Warm both sides. The divider is vertical, rather than horizontal, in this home. Again, it creates more intimate areas within an open layout. The bonus is the inset fireplace, which is double-sided and a cozy focal point for this seating area and the one beyond.

Employ a multitasker. In this bedroom and bathroom space, the divider is a headboard that allows bathroom access to one side and leaves the draped ceiling visible. Notice how it’s fitted with a glass panel to let light through.


Do You Recognize These Common Side Effects of Remodeling?

Living through construction isn’t easy. Even if you’ve planned every last detail, the reality of having builders and decorators in the house for months on end can drive anyone slightly mad. Here are side effects of going through a renovation project, along with tips on how to come out the other side with your sanity, relationships and bank balance intact.

Expanding Your Project’s Scope

You started off simply updating your kitchen. Then, as the project took form, you decided you’d like to tackle your dining area as well. And your downstairs powder room. And your hall. The problem with improving one part of your home is that it swiftly throws into light how shabby the rest of your place looks in comparison. If you already have a competent team of builders, painters and carpenters across your threshold, it’s tempting to retain them for a few more weeks.

But this gradual increase in your project’s scope means you’ll inevitably require a bigger (possibly much bigger) budget. Falling prey to this common side effect also means your original schedule will need to be completely redrawn. Ultimately, it will leave you with no privacy for months and, in the worst-case scenario, in serious financial dire straits

Take a long, hard look at your bank account. Do you like eating? Being able to turn on your central heating? Unless you’re blessed with bottomless funds, then it’s a good idea to not get too carried away. As we all know, budgets have a habit of spiraling — and as your vision expands, this is going to get worse.

Obsession With Other People’s Houses

Although it’s great to find inspiration in a friend’s gorgeous home, it can also cause stress and panic, especially halfway through a project when you wonder if you have it all wrong and everyone else has it right.

Tips To Avoid Home Renovation Mistakes

Cheap Remodeling Ideas

Renovating or remodeling your home does not have to be expensive. Whether you are trying to update and remodel a house to get it ready to sell or to make it a more comfortable place for you to live, there are plenty of ways you can fix up your house without spending a lot of money. These changes will:

  • make your house a more comfortable place to live,
  • help increase the market value,
  • make it look better for your guests who visit,
  • and let you enjoy your house to its fullest extent.

Here are some tips on how to save money as you remodel, renovate, and beautify your home.

Remodeling and Renovating on a Budget

Remodeling and renovating a home does not have to be expensive. Here are a few ways to remodel your home without breaking the bank.

  • Make changes that have a big impact.
  • Considering small things that make a big difference.
  • Do it yourself.
  • Trade and barter for labor.
  • Borrow or rent tools.
  • Shop around for the best price.
  • Consider your needs when you buy.
  • Buy second-hand goods.
  • Think creatively.

By using the tips provided, you can save a great deal of money while increasing the functionality and beauty of your home. 

Make Big-Impact Changes First

To save money, you want to consider making the changes that have the greatest impact first—the things that will get the most bang for your buck. Things like paint, flooring, lighting, and arrangement and existence of appliances and furniture. A fresh coat of paint can quickly and economically update, brighten and enhance a home.

Then, if you still have money in the budget, you can make the changes that will enhance the home in more subtle ways.

Smaller Changes That Can Have a Big Impact

In addition to thinking big, you should also think small. There are small changes you can make that make a big impact as well.

  • Changing the hardware of cabinets, for example, can change the look of the kitchen without having to replace the cabinets.
  • Painting the trim instead painting the whole house might be sufficient depending on your situation.
  • Adding a drawer organizer might keep you from needing another drawer.
  • Repairing instead of replacing some things could avoid headaches and cost less, depending on the amount of time and material it would take to repair them.
  • Changing the rug or towels in the bathroom, or a new bedspread or curtains in the bedroom can change of the look of the room without any remodeling whatsoever.

Understanding when is a home equity loan a good idea

A home equity loan is a secured loan. You offer your home up as collateral, and in exchange the bank extends you money that has to be paid back over a specific period. Since your home acts as collateral, you can usually get better terms on the loan than you would without collateral being offered. And you may save money on taxes based on your individual situation.

This means that you can get a lower interest rate on the loan than what you’d qualify to receive on a loan without collateral. Low interest means you’ll end up paying less money over the life of the loan.

For example, the total interest paid on a 3-year loan for $10,000 at 5 percent APR is $789.52, while at 6 percent APR the same loan would cost $951.90 with added interest. The monthly payments are also slightly higher at six percent versus five, because you have to pay more within three years to pay it off with interest added – the difference is about $5 on this example.

So on one hand there can be good reasons to use a home equity loan.

Increasing my mortgage – what is a further advance?

A further advance is taking on more borrowing from your current mortgage lender.

This is typically at a different rate to your main mortgage.

This route can make sense if:

  • Your lender’s further advance is competitive
  • You don’t want to remortgage or switch lenders.

You can spread your payment over a long term and your interest rate should be lower than a personal loan.

But always check the market to see if you can get a better deal before committing.

When a further advance might make sense

There are two situations when a further advance might be suitable:

  • To fund home improvements
  • To raise a deposit for a second property, perhaps as a buy-to-let investment

Can I Get A Mortgage For More Than The Value Of The Property?

The family member has had the house valued at $120,000 but has offered it to us for $70,000 to help us on to the property ladder.

The house is in need of a rewire, central heating and new windows, bathroom and kitchen.

As the house is valued at $120,000, would it be possible to take out a mortgage of $100,000 even though we are buying the house at $70,000? 

No lender will give you a $100,000 mortgage to buy a property costing $70,000. Any mortgage offer will be based on the purchase price of the property – even if this is lower than the actual value. And the most you’ll be able to borrow with a conventional mortgage would be 90% of the price which, in your case, would be $63,000. To be able to get a mortgage of $100,000 you would need the purchase price to be just over $111,111 and to be able to put down a cash deposit of $11,111.

That’s not to say you won’t be able to borrow to pay for renovation costs as most mainstream lenders are prepared to lend money for building costs but they don’t pay the money up front which wouldn’t suit you. Instead any money lent is paid after the building work is complete and the property has been revalued.

To be able to pay for building works before they are finished, you’ll need a specialist renovation mortgage such as those available through Buildstore Mortgage Services. Its Ideal Home Improvement mortgage allows you to borrow up to 95% of the cost of the property as well as up to 95% of the improvement costs. So you might be able to borrow $66,500 to buy the house and $28,500 to put towards the cost of renovating. You’ll still need to find cash for the deposit on the property and the first 5% of renovation costs.

Master Bathroom Remodelling Options

Estimating Bathroom Remodel Costs

Bathroom remodel costs run anywhere from $2,500 to $25,000. Large master baths in luxury homes might even hit or exceed $50,000. The typical homeowner will spend between $6,000 and $15,000 for a complete tear out and replacement of all walls, fixtures and appliances.

Labor will run you anywhere from 40% to 65% of your total project. Ranges depend on your location. While material pricing doesn’t change much from place to place, a higher cost of living means higher wages.

Determining your bathroom makeover budget can be tricky. Consider the following:

  • Room size.
  • Regional pricing differences. Expect to pay up to 20% more if you live in an area with high real estate prices.
  • Quality of materials. A fiberglass shower surround might run only $300. Custom tile work can easily hit $3,000+.
  • Changing the floor plan. Making your bath larger, like converting a half bath to a full bath costs an additional $5,000+.
  • Type of fixtures, appliances, counters and finishes you choose. Make a plan that includes both design and budget before choosing what to buy for your bath remodel.

Remodeling Phases

Most bathroom remodels will include some degree of layout or planning. Small bathrooms can be planned by a contractor, but larger rooms should involve the work of a bathroom designer to help make the most of the space. This service typically costs between $1,400 and $4,000, and in some cases, the costs can be recouped during the renovation, as designers can help you save money in other areas. This phase of the project generally includes not only planning, but also drawings, and the selection of the materials that you want to go into the room. The time frame for this phase can last several weeks depending on layout and what you ultimately want the room to look like.

Following the planning, your bathroom project will involve ordering the new materials, and waiting out the lead times for them to arrive. It is not uncommon to wait up to 12 weeks for some specialty items to arrive.

Once your new materials have arrived, the tearout begins. This involves removing everything from your bathroom right down to the studs. At this point in time, if there are issues with water leaks or mold, they can be addressed. It is at this stage that hidden issues are usually uncovered. Keep in mind that issues can dramatically impact your costs, depending on what is found. For example, mold remediation starts at $500 and water damage can cost as much as $2,700.

After the tearout, the plumbing and electrical are updated throughout the room to accommodate your new layout and fixtures. Then new backer board and subflooring 1 are put in, followed by tiling, and finally the installation of fixtures, lights, and accessories. From tearout to completion is usually a two to three week timeframe. Costs for this phase of the project range from $45-$65 for a plumber to $65-$85 an hour for an electrician and $5-$10 a square foot for flooring and tile preparation.

How Much Does a Shower Remodel Cost?

Full showers are more suited for adult homes where most people take quick and convenient showers. Shower and tub combinations suit families with younger children or pets, where the children or pets can be washed in the tub and adults can also enjoy the convenience of a quick bath.

To remodel a shower and tub combination, expect to incur about $1,400 to $1,600. Included in this cost are the installation expenses (about $1,000), which include plumbing modifications, fixtures and sinks.

Full showers (or stand-alone showers) typically cost about $700 to $800 to install. This cost includes the expense for a shower stall as well as labor installation expenses.

A shower and tub combination can be remodeled by simply adding a new liner over the current tub. A bathtub liner costs between $150-$250. The shower walls can also be fitted with liner at a cost of about $120. The labor costs of adding liner are typically about $300.

For stand-alone showers, remodeling often involves working on the walls, ceiling and floors. If you choose to retile your shower space, expect to spend $2-$5 per square foot of tile. Labor costs typically lie at about $10-15 per square foot.

Fixtures can also be upgraded and the shower head replaced. Some more in-depth shower remodel projects carried out by a professional can cost as much as $4,000.

Budget Allocation

The way your budget gets allocated largely depends on your design choices and priorities. But if you’re looking for some standard guidelines, you can reference the National Kitchen and Bath Association’s cost breakdown:

Design – 4%

Labor – 20%

Flooring – 9%

Walls & Ceilings – 5%

Doors & Windows – 4%

Faucets & Plumbing – 14%

Countertops – 7%

Cabinetry & Hardware – 16%

Fixtures – 15%

Lighting & ventilation – 5%

Other – 1%

Final Tips

Be Realistic: If you’ve got a luxurious design plan, don’t expect it to build it with a small budget. Evaluate your expectations and be realistic about what they’ll cost to achieve.

FACTORS TO KEEP IN MIND WHEN SELECTING TILES FOR SMALL BATHROOMS

No matter who you ask, everyone has a different opinion on the sizes of tiles you should use for your bathroom floor, especially if you’re trying to make your small bathroom feel larger. So which advice should you take on board and which should you ignore?

When choosing your floor tiles, there are a few factors you need to keep in mind. Firstly, it’s important to consider the look and feel you would like to display to your guests and most importantly the look and feel that you yourself would like – it is you who will be seeing and using this room every day after all! As with everything that comes to interior design, choosing the right bathroom tiles for your project is very subjective as everyone has different tastes, wants and needs.

TILE SIZE

The bigger the tiles, the smaller the room will look…or so they say. Generally, interior designers will say that you shouldn’t use large tiles (such as 60×60 cm or 80×80 cm) in a small bathroom as it will make the room look smaller. On the other hand, if you use a small tile for your small bathroom, then there will be more grout lines, this will also make your bathroom look small… so what should you do!?

You could either use medium sized tiles or you could choose larger tiles, just make sure that it has rectified edges and you use a grout colour that matches them. This will make your larger tiles flow better, and the scale of the room will not be disrupted. This will also create a simplified, modern space which will be your ‘blank canvas’.

COLOUR SCHEME

It’s also advised that you should choose a neutral colour scheme for your small bathroom. Choosing lighter colours for your bathroom tiles, such as white, cream or even a light grey, will help make your small bathroom look that much bigger, thanks to the tiles reflecting more light than darker coloured tiles would.

These light tiles enable the eye to ‘flow’ across the room, and if also used on walls, they will make your ceiling look higher.

FIXTURES

The choice and placement of your fixtures and fitting in your bathroom can also affect how small your bathroom would look. If you have a small bathroom, installing large taps, sinks and other fixtures will make it look overcrowded and cramped. Choose modern, sleek fittings that work with the size of your bathroom to keep everything in proportion. It’s important to map this all out in a scaled drawing before you start building or renovating.

TILE LAYOUT

Our final tip in making your small bathroom look bigger is to lay your tiles in a diagonal pattern. Diagonal patterns trick our minds into thinking that a space is bigger than it really is. We don’t see the normal squared tiles when laid this way, so our eyes are instead drawn to the diagonal points while our brain has a lot more trouble figuring out how many tiles are actually there.

Another way to make small bathrooms look bigger is to use rectangular tiles, like a size 30×60 cm. If you lay rectangle tiles horizontally or on their side going up the wall or along the floor, this will give the illusion that the walls are wider than they actually are. If you lay the same tile vertically, you will make the room look taller or the room longer if used on the floor.