One-Way Lighting Circuit Modified for
Two-Way Switching
Here are some helpful diagrams that show
how lighting operating on a one-way switch can be changed relatively easily for
two-way switch operation.
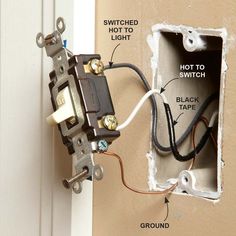
Turn off the consumer unit and remove the
appropriate circuit fuse / miniature circuit breaker first before working on
any electrical circuit, once the cable is installed make the connections to the
two-way switches as shown.
show the original switch connected with
original (old colours, twin Red and earth) switch-wires and the additional
two-way switch linked with cable in the new colours, which in the case of three
core and earth are Brown, Black, Grey and an earth-wire which should be covered
with Green and Yellow sleeving. This is because electrical cable is only
available to buy in the new colours.
Whenever an electrical installation uses
both colours of cable, a self-adhesive warning label should be stuck to the
front of the consumer unit.
The label normally reads: CAUTION
– This installation has wiring
colours to two versions of BS7671. Great care should be taken before
undertaking extension, alteration or repair that all conductors are correctly
identified. These labels can be obtained from most electrical wholesalers for a
few pounds as a cash sale.
Outdoor installation hints and tips
We want you to get the most from your Hive
View Outdoor. Here are some tips to help you find the perfect spot to position
and install it.
Hive View Outdoor automatically starts
recording if it detects motion or sound. But switch on people detection and it
will only record if it picks up a person.
Here’s how to get person detection working
for you:
Height: Make sure your camera is just above
head height, between 2-2.7m (or 7-9 feet) from the ground.
Angle: Your camera needs to be slightly
tilted down – around 30° (see image 1 below). Any more than 40° and your camera
might not be able to see a person’s face, especially if they’re wearing a hat
or hoodie.
Range: For person detection, the range of
the camera is 12m/40 feet during the day and 4.5m/15 feet at night. If you want
to monitor an area further away than 12 metres, the best thing to do is set
your camera to motion detection rather than person detection.
Testing: When your camera is set up, walk
past at the maximum range you need. If it doesn’t detect you, try switching
motion detection on the settings screen in the app.
For porches and entrances use full motion
detection.
Person detection is ideal if you want to
detect people from other movements. But if your camera is tilted down and
monitoring a small area like your entrance or porch, you might not need it.
Instead, set your camera to motion detection to make sure it captures
everything.
Keep your camera in the shade.
Hive View Outdoor is weatherproof and
designed to work between -20 to 45C (-4 to 113 F). Just make sure it’s well
ventilated and not positioned in direct sunlight. This avoids overheating, and
your camera being triggered by a sudden change in brightness like the sun going
behind a cloud.
How Much Does It Cost to Replace a Light
Switch?
The cost to replace a light switch is $50
to $200. The difference depends mostly on the type – standard, double, dimmer
or timer switch.
If you have a light switch that no longer
works, it needs to be replaced. Unless you are unfamiliar with electrical work,
it’s wise to bring in a professional. An electrician can help make wiring a
light switch hassle-free. He’ll also be able to install an upgraded light
switch that can make your life a little easier.
Switches with extra features like dimmers
or timers can really amp up the functionality of a simple switch. While these
may cost a little more than your standard light switch, they offer a few
benefits that may be worth the extra price tag.
Home Electrical Upgrades and Costs
When you call an electrician into your
house, you’re trusting them to know what they’re doing. Check out our tips on
avoiding expensive upgrades you don’t need.
Standard Light Switch Replacement
A single light switch is the most standard
“on and off” switch you have in your home. It turns on and off one
item, such as a light or a fan. Over time, the crisp up-and-down click of the
switch begins to wear out. When you feel this happen, it’s best to replace the
switch before it completely fails to operate.
Tips For Professional Wireless Access Point
Installation
Congratulations! If you’re reading this,
you probably purchased a new wireless system or are thinking about it and are
looking-up some of the best practices for performing your wireless access point
installation. Before you begin, it’s important to know that there is more to
WiFi than meets the eye, and things you may not consider, like where and how
you mount the access point, matter a lot more than you think.
Wireless access point installation isn’t
difficult but if you get it wrong, you will feel the pain. We’ve seen some
really funky installations and have heard horror stories from clients about so
called “tips” that they received from self-proclaimed wireless service experts.
Our clients have told us that other providers recommended mounting access
points at 45 degree angles or waiting up to 7 days for wireless signals to
propagate within their office. Knowing that people have paid other service
providers for such terrible advice is simply horrifying and we’re here to tell
you the truth. Part 1 of our tips for installing wireless access points will
focus on your network requirements, your existing network environment, as well
as, the physical installation. Part 2 will focus on advanced network
configuration and how to prime your wireless access points for peak
performance.
Whether you’re installing access points at
a large office, home, warehouse or open area like a park or boardwalk, taking
the following steps will typically leave you with a usable WiFi network that
will stay connected and provide that bandwidth throughput that you expect
Understand all of your network requirements
Knowing your network requirements is
perhaps the most essential stage of any WiFi installation. Think about how many
people, or more specifically, how many devices, will be connecting to the
network and what types of activities they will be doing online. Jot your notes
down or even create a spreadsheet to capture your thoughts in an organized
fashion and make the rest of these steps a whole lot easier.
Choose the right equipment for your
wireless network
Once you determine your requirements, it’s
a lot easier to find the right access point, but the large selection can still
present a challenge. There are so many options on the market that even wireless
professionals find themselves overwhelmed trying to pick the best access point
for their customers’ budget and requirements.
Setting up the Wemo Smart Light Switch
Installation of the Wemo Light Switch to
the electrical line
It only takes a few minutes to set up your
Wemo Light Switch. If you are unable to
identify which is a load wire and a line wire, or is unfamiliar or
uncomfortable with electrical work, please call a professional electrician.
Electrical Installation Requirements
A Neutral wire (requires all three AC
electrical connections at the wall switch)
A single pole light switch (not compatible
with lights controlled by more than one switch)
IMPORTANT:
The Wemo Light Switch is not designed to work with metal faceplates
because they interfere with the Wi-Fi signal.
It is recommended to use the light switch for residential and dry indoor
locations only.
Shut OFF the power at the circuit breaker
for the switch you are replacing. You
may need to shut OFF more than one circuit breaker/switch to make sure the
switch you’re working on is powered OFF.