Tips For A Trouble Free Interstate Local Moving

Local Moving Guide

An In-State or local move is any move of household items, which take place from the origin to the final destination within the same state. The cost of a local move is usually determined by hourly rates. The hourly rate may vary depending on the amount of labor needed to complete the move. It is best to receive on-site estimates from movers that come to your home and determine how many men, hours, and packing materials are necessary for your relocation. The estimate given to you from the mover should include the total cost for packing, insurance, and labor, as well as conditions based on the origin address and the destination address. If you are not sure of the exact location you are planning to relocate, your price may be subject to a change based on the final destination conditions such as stairs, long carries, and access for a semi-trailer.

One of the more important things you should do before you move is to have complete knowledge of your new neighborhood, and the route to your final destination. With local moves timing is everything. Also check your new area for the availability of suitable parking for the truck so that the movers can load and unload the truck comfortably. Always check the restrictions of your building/complex, or for the need to schedule an elevator or to provide certificates of insurance.

Proper Packing

There are three different ways to pack up your household items. You can do it all yourself, have the local moving company partially pack some of your items, or you can have them pack everything. If you have anyone else other than the local moving company pack your items understand that the local moving company is not liable for any of the damage that occurred inside of the boxes during your move.

Choosing When To Move

Picking the time of year, month and day of the week can be very crucial in your move. Most people choose to move during the summer months when their kids are out of school or during vacation. Moving companies need to hire seasonal help to meet this increase in moving demand. This means that inexperienced movers are often hired during these busy months. This problem also exists during the end and beginning of each month when everybody’s lease is up, and on Fridays when people take off of work. Also, if your move should only take about half a day, hiring movers for first thing in the morning is always recommended.


A Practical Guide To Interstate Moving

Moving your household possessions and relocating to a new home is one of the most important activities that you will undertake. Thats why its important for you as a consumer to become familiar with the moving industry and to better understand your rights and responsibilities when you move.

While most trucking companies are now required only to receive the proper authority to operate and to be registered with the Department of Transportation, interstate movers must meet two additional requirements. First, movers must publish their tariffs (a tariff is the movers price list for performing moving services) and make them available for inspection by any consumer who asks to see a copy. Second, movers are required to participate in a Dispute Settlement Program and to offer neutral arbitration as a means of resolving disputed loss and damage claims and certain types of disputed charges.

Most people who use a professional mover never have a problem or need to file a claim. And the vast majority of claims that are filed are resolved to the consumer’s satisfaction in a timely manner. However, problems do sometimes occur that cannot be easily resolved.

Why You Should Use A Professional Mover

Professional movers provide a valuable service by moving thousands of people to new homes each year. While almost no move is ever completely stress-free, when you use a professional mover, all of the heavy lifting will be done for you. Movers will pack your possessions, load them into the truck, drive the truck to your destination and unload and unpack your shipment at your new home. Movers can also provide you with warehouse storage, move your piano up and down flights of stairs, transport your automobile, and service your appliances to insure their safe transportation

If you are considering moving yourself, especially if you will be moving interstate, you should ask a lot of questions and compute the actual costs of self-moving before you sign an agreement with a truck rental company. The information in this part of the Consumer Guide will help you to calculate self-move costs and give you a basis of comparison when evaluating the price and value of professional moving.


Local Movers

Does the thought of moving from one place to another give you headache? Have no worries! We help you find professional local moving companies to relieve you of your troubles. Not only this, we also assist you in getting needed resources and handy information so that you have an easy and convenient local move. If your move is within a radius of 100 miles and does not cross any state lines, it is a classified as a local move.

Moving to a different home can be very stressful. However, hiring experienced local movers reduces the burden of shifting. Get all your household items transferred efficiently and on time. With professionals at work, you just need not worry.

With the increasing competition in every industry, it is not easy finding appropriate professional movers that are both time and cost effective, in addition to being efficient. Nothing to fret! We are here to assist you in finding the right local movers suited to your requirements.

You need to follow just three simple steps to receive free moving quotes from us. In the first step, select the type of service as Local Move. In the second one, enter your origin and destination. In the third step, fill in your particulars. We will then send you competitive personalized quotes from the top local movers in your area. You can compare the rates and services offered by the various moving companies and select one that suits you best.


MOVING GUIDE

We can assist you with your upcoming move by taking care of all the details. Because there is so much to plan and organize, it is important that you trust a moving expert

The key to a successful move is planning. Planning and organizing your move will help you alleviate the stress of moving, and avoid any surprises. The relocation process takes anywhere from 90-120 days. During this time, you will need to plan and organize your move. The more organized you are, the less stressed you will be. When using a professional mover, be aware that the summer months are the busiest, so be sure to contact your agent 30 to 45 days prior to your preferred move dates so that you are not disappointed.

MOVING WITH CHILDREN

A move can be especially taxing for children. Here are some helpful tips to ease their concerns and make your move easier:

Get them involved – this will help alleviate some of your child’s stress about moving to a new place

Let them pack their own special box belongings

Discuss their fears and worries about the move

Be sure they are not there on moving day, as they may become upset that their things being loaded on the truck. We suggest that they spend the day with family or friends to minimize their anxiety about the move. Proper planning will help your children in the transition to you new home and community.

MOVING YOUR PETS

Pets cannot be moved on the moving truck. Be sure that they are not present on moving day as they might get in the way. Also, arrange for your pet’s transportation in advance. You might want to visit your veterinarian to obtain your pet’s health records, to update their tags, and to obtain tranquilizers to calm your pet during transport.


Your Residential Moving Guide & Checklist

Whether you’re moving across town or across the country, relocating your entire household can be a complicated and stressful experience. We’ve researched the best of the best and compiled a detailed moving guide and checklist to help make sure your local or interstate relocation is smooth and easy from start to finish.

Wherever life is taking you, we will help make your household move simple and smooth. Let our friendly experts guide you through every stage of the process, from planning and packing to setting up your new home. We have the latest tools, tips and techniques to make your move as painless as possible.

How To Find A Certified Electrician

Electrics: The Basics

Designing and installing a new electrical system in your home is one of the more complicated elements of the overall building project. Most renovators, faced either with historic electrics untouched since the era of Bakelite’s dominance (if not before) or, perhaps worse, ‘improved’ and amended over years of previous owners’ marginal projects (closed off faceplates and switches that don’t work being classic signs) will also be keen to bring things up to date.

For those of us who didn’t listen much in physics classes, the world of electrics can be quite scary and for most, the services of an electrician are essential. However, it is critical to approach the specification of a new electrical system with a few key bits of knowledge, such as:

How an electrical system works, the rules regarding electrical work, and what you would like it to do.

Information on systems that go beyond the basics.

Typical cost expectations.

Electrics is one of the more dangerous elements of a home construction project. Each year, on average, 10 people die and 750 people are seriously injured as a result of electrical work — so approach any attempts at DIY seriously

The Basics

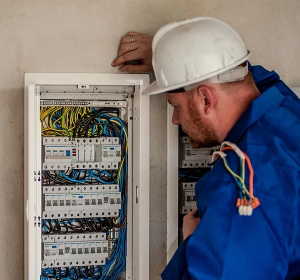
Electrical systems start with, and from, the meter, which belongs to the electricity board. From there it goes to your consumer unit (also known as a distribution board or fuse board) which has a main switch, and to the lifesaver RCD (Residual Current Device), and then it feeds all the circuits in your house via a miniature circuit breaker — MCB (fuse).

RCDs really are lifesavers: they trip out on leakage, not overload, meaning they cut off the flow of electricity automatically when they sense a ‘leakage’ – or imbalance – of electric current from a circuit. Whatever’s going into the circuit, carried on the live and neutral wires, must remain balanced as it flows through and returns — or the RCD will trip.


A guide to the electrical safety certificate

Nobody likes a dodgy landlord: someone happy to charge their tenants rent, but cutting corners when it comes to maintaining their property, leaving it below standard and in disrepair – because, after all, they don’t have to live there.

government has introduced a number of measures in recent years to reduce this kind of behaviour – for example, landlords can no longer look after the deposit themselves, in case they pocket the lot should a dispute arise. Also, landlords need health and safety checks to ensure all the basics meet certain standards; in terms of electrics, that means acquiring an electrical safety certificate.

The Electrical Safety Council is the governing body that writes the necessary guidelines. It also publishes helpful literature, such as The Landlord’s Guide to Electrical Safety. By applying the guidelines and earning a certificate, this is proof for tenants that all the electrics within a property are of a good standard and safe to use upon moving in.

The certificate is a requirement by law and, if asked by the authorities, a landlord must be able to produce the paperwork within seven days. Regular checking of the electrics is recommended, but only a legal requirement in certain properties.

Sockets and appliances

An assessment for a landlord’s electrical safety certificate makes the distinction between fixed installations – wiring, switches, sockets, light fittings – and appliances, including TVs, refrigerators and toasters. Any appliances provided by the landlord must be included in these checks, to ensure they work and that there’s no risk of injury. They must also carry at least a CE marking: the manufacturer’s claim it meets EU standards.


Electrician

How to become an electrician

You can get into this job through:

a college course

an apprenticeship

applying directly

College

You can take a Level 2 and 3 Diploma in Electrical Installation, which may help you to find a trainee position with a company.

Entry requirements

You’ll usually need:

2 or more GCSEs at grades 9 to 3 (A* to D), or equivalent, for a level 2 course

4 or 5 GCSEs at grades 9 to 4 (A* to C), or equivalent, for a level 3 course

Direct Application

You may be able to move into electrical installation work if you’ve got experience and relevant qualifications from a related industry, for example building services or electrical engineering.

Skills and knowledge

You’ll need:

the ability to use, repair and maintain machines and tools

knowledge of building and construction

maths knowledge for understanding technical plans

to be thorough and pay attention to detail

problem-solving skills

the ability to use your initiative

the ability to work well with your hands and use equipment safely

customer service skills for working with colleagues and clients

to be able to carry out basic tasks on a computer or hand-held device

Day-to-day tasks

Your work will depend on what type of electrician you are, for example:

installation electrician – install power systems, lighting, fire protection, security and data networks in buildings

maintenance electrician – check electrical systems to make sure they’re working correctly and safely

electrotechnical panel builder – make and install control panels that operate electrical systems in buildings, like heating or alarms

machine repair and rewind electrician – fix and maintain electrical motors and transformers found in industrial equipment

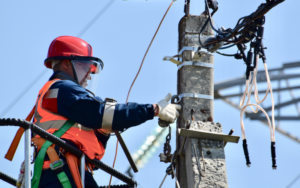
highway systems electrician – install and maintain street lighting and traffic management systems


How to Become an Electrician: Career Guide

It doesn’t matter what your situation may be, or what occupation you may have, you need the power to perform your day-to-day functions. Because electricity is such a vital utility to have for all of us, this puts electricians in high demand; so much of the world depends on them daily.

Electrician – Job Description

The term Electrician is referring to the occupation of an individual in which they perform work on electrical equipment around our homes and neighborhood. This can entail installing new electrical boxes or replacing parts in your current one, upgrading or maintaining these boxes or other vital pieces of electrical equipment.

Because of the nature of the work that is being performed, electricians should know the ins and outs of power, lighting, and electrical control systems. Every job that an electrician performs will require looking at the specific blueprints from the city for that particular property, understanding where everything is located and what needs to be done, and then to physically perform the necessary actions on the electrical box and other electrical equipment.

Some electricians are more skilled in specific areas, and as such will specialize in those. For instance, one electrician may be skilled in highway electrical systems while another may be more suited to perform work on residential properties.

it is also important to learn all that you can to diversify your skillset; this will make it easier for you to go from job to job without fear of not knowing how to perform a specific action or work on a specific piece of electrical equipment.

Duties

Plan electrical systems for new buildings and future developments

Fully read and understand blueprints, diagrams, and technical documents to perform the job correctly

Set up and install electrical systems such as wiring and lighting; making sure that these are up to code for new and old buildings

Form and connect electrical circuits

Complete both the installation as well as the future maintenance of electrical panels and products. This can include the act of inspecting said products; such as circuit breakers and transformers

Maintain the desired functions of electrical products; this includes, but is not limited to repairing, replacing, and upgrading outdated and malfunctioning equipment.


Installation and maintenance electrician

Install, maintain and repair electrical systems in industrial, commercial and domestic environments

An installation and maintenance electrician installs, maintains and repairs electrical equipment and systems, from switchboards to renewable energy technologies, in industrial, commercial and domestic environments. As an apprentice, you may also contribute to the design of electrical systems. You’ll be able to set out jobs from drawings and specifications to the requisition of the necessary installation materials.

During this apprenticeship, you’ll specialise in one of two occupations: installation, as in working on the installation, testing, commissioning and maintenance of low voltage (less than 1000v) electrical and electronic devices and appliances; or maintenance, where you’ll maintain electrical and electronic installations. In this role, your duties will include the supervision of the equipment, its maintenance and necessary repairs.

Electrical Switches Installation And Sockets

One-Way Lighting Circuit Modified for Two-Way Switching

Here are some helpful diagrams that show how lighting operating on a one-way switch can be changed relatively easily for two-way switch operation.

Turn off the consumer unit and remove the appropriate circuit fuse / miniature circuit breaker first before working on any electrical circuit, once the cable is installed make the connections to the two-way switches as shown.

show the original switch connected with original (old colours, twin Red and earth) switch-wires and the additional two-way switch linked with cable in the new colours, which in the case of three core and earth are Brown, Black, Grey and an earth-wire which should be covered with Green and Yellow sleeving. This is because electrical cable is only available to buy in the new colours.

Whenever an electrical installation uses both colours of cable, a self-adhesive warning label should be stuck to the front of the consumer unit.

The label normally reads:  CAUTION  –  This installation has wiring colours to two versions of BS7671. Great care should be taken before undertaking extension, alteration or repair that all conductors are correctly identified. These labels can be obtained from most electrical wholesalers for a few pounds as a cash sale.

Outdoor installation hints and tips

We want you to get the most from your Hive View Outdoor. Here are some tips to help you find the perfect spot to position and install it.

Hive View Outdoor automatically starts recording if it detects motion or sound. But switch on people detection and it will only record if it picks up a person.

Here’s how to get person detection working for you:

Height: Make sure your camera is just above head height, between 2-2.7m (or 7-9 feet) from the ground.

Angle: Your camera needs to be slightly tilted down – around 30° (see image 1 below). Any more than 40° and your camera might not be able to see a person’s face, especially if they’re wearing a hat or hoodie.

Range: For person detection, the range of the camera is 12m/40 feet during the day and 4.5m/15 feet at night. If you want to monitor an area further away than 12 metres, the best thing to do is set your camera to motion detection rather than person detection.

Testing: When your camera is set up, walk past at the maximum range you need. If it doesn’t detect you, try switching motion detection on the settings screen in the app.

For porches and entrances use full motion detection.

Person detection is ideal if you want to detect people from other movements. But if your camera is tilted down and monitoring a small area like your entrance or porch, you might not need it. Instead, set your camera to motion detection to make sure it captures everything.

Keep your camera in the shade.

Hive View Outdoor is weatherproof and designed to work between -20 to 45C (-4 to 113 F). Just make sure it’s well ventilated and not positioned in direct sunlight. This avoids overheating, and your camera being triggered by a sudden change in brightness like the sun going behind a cloud.

How Much Does It Cost to Replace a Light Switch?

The cost to replace a light switch is $50 to $200. The difference depends mostly on the type – standard, double, dimmer or timer switch.

If you have a light switch that no longer works, it needs to be replaced. Unless you are unfamiliar with electrical work, it’s wise to bring in a professional. An electrician can help make wiring a light switch hassle-free. He’ll also be able to install an upgraded light switch that can make your life a little easier.

Switches with extra features like dimmers or timers can really amp up the functionality of a simple switch. While these may cost a little more than your standard light switch, they offer a few benefits that may be worth the extra price tag.

Home Electrical Upgrades and Costs

When you call an electrician into your house, you’re trusting them to know what they’re doing. Check out our tips on avoiding expensive upgrades you don’t need.

Standard Light Switch Replacement

A single light switch is the most standard “on and off” switch you have in your home. It turns on and off one item, such as a light or a fan. Over time, the crisp up-and-down click of the switch begins to wear out. When you feel this happen, it’s best to replace the switch before it completely fails to operate.

Tips For Professional Wireless Access Point Installation

Congratulations! If you’re reading this, you probably purchased a new wireless system or are thinking about it and are looking-up some of the best practices for performing your wireless access point installation. Before you begin, it’s important to know that there is more to WiFi than meets the eye, and things you may not consider, like where and how you mount the access point, matter a lot more than you think.

Wireless access point installation isn’t difficult but if you get it wrong, you will feel the pain. We’ve seen some really funky installations and have heard horror stories from clients about so called “tips” that they received from self-proclaimed wireless service experts. Our clients have told us that other providers recommended mounting access points at 45 degree angles or waiting up to 7 days for wireless signals to propagate within their office. Knowing that people have paid other service providers for such terrible advice is simply horrifying and we’re here to tell you the truth. Part 1 of our tips for installing wireless access points will focus on your network requirements, your existing network environment, as well as, the physical installation. Part 2 will focus on advanced network configuration and how to prime your wireless access points for peak performance.

Whether you’re installing access points at a large office, home, warehouse or open area like a park or boardwalk, taking the following steps will typically leave you with a usable WiFi network that will stay connected and provide that bandwidth throughput that you expect

Understand all of your network requirements

Knowing your network requirements is perhaps the most essential stage of any WiFi installation. Think about how many people, or more specifically, how many devices, will be connecting to the network and what types of activities they will be doing online. Jot your notes down or even create a spreadsheet to capture your thoughts in an organized fashion and make the rest of these steps a whole lot easier.

Choose the right equipment for your wireless network

Once you determine your requirements, it’s a lot easier to find the right access point, but the large selection can still present a challenge. There are so many options on the market that even wireless professionals find themselves overwhelmed trying to pick the best access point for their customers’ budget and requirements.

Setting up the Wemo Smart Light Switch

Installation of the Wemo Light Switch to the electrical line

It only takes a few minutes to set up your Wemo Light Switch.  If you are unable to identify which is a load wire and a line wire, or is unfamiliar or uncomfortable with electrical work, please call a professional electrician.

Electrical Installation Requirements

A Neutral wire (requires all three AC electrical connections at the wall switch)

A single pole light switch (not compatible with lights controlled by more than one switch)

IMPORTANT:  The Wemo Light Switch is not designed to work with metal faceplates because they interfere with the Wi-Fi signal.  It is recommended to use the light switch for residential and dry indoor locations only.

Shut OFF the power at the circuit breaker for the switch you are replacing.  You may need to shut OFF more than one circuit breaker/switch to make sure the switch you’re working on is powered OFF.

How To Install a Ceiling Fans Installation

New Ceiling Fan and Tips to Install your Own

It worked just fine but wasn’t entirely our style. The wood matched the color of our hardwood floors before we stained them darker. So this light wood fan just didn’t really seem to go with anything else in the house

At night I would lay in bed and stare up at it thinking, “I have to get a new fan!” I would also think, “Dang. I need to get up there and dust. I can see the dust bunnies from down here!” My least favorite place to dust…

Well, I’m so happy that I finally followed through on this task and we now have a new ceiling fan! I’m not gonna lie, I had every intention of making this a “How to Install a Ceiling Fan” post. But then once I installed it and realized how many steps there are…I decided to just offer some of my tips and tricks that I learned along the way. Plus every ceiling fan will come with a different set of instructions, so I figured a step-by-step tutorial on how my fan was installed might not be as helpful.

First, find the right sized fan for your space. The bigger your room, the bigger the fan you’ll need. Here are some general guidelines…

36″ diameter = Longest Wall in Room is < 12 ft

42″ diameter = Longest Wall in Room is between 12-15 ft

52″ diameter = Longest Wall in Room is > 15 ft

Make Time During the Day

I assumed this project would take about 1 hour from start to finish, but I definitely underestimated the time. Give yourself at least 2-3 hours of uninterrupted time to get this project done. I also advise doing this during the daytime since you will need to turn the power off in the room and you’ll need light to see what you’re doing!

Enlist a Buddy

When it comes to DIY projects like this one, I often prefer to work alone (or sometimes with Bridget). However, this is definitely a 2-person job. You may need someone to hold the old fan while you disconnect the wires, you’ll need a helper to hand you things while you’re up high on the ladder, and you’ll want a buddy to help you lift up the new heavy fan to the ceiling.

How Many Blades Should Your Ceiling Fan Have?

With summer now in full swing, ceiling fans are one of the best upgrades you can make to your home. They are far more effective than pedestal fans and operate at the fraction of the cost of air conditioners.

But when choosing a ceiling fan, it can be difficult to work out the best option for your home. There are so many different styles and configurations on offer that it can be difficult to choose. One question we are often asked is how many blades a ceiling fan should have. This is a great question, as the number of blades does affect a room, as well as efficiency of the fan, blade pitch, balance and motor.

CEILING FAN BLADES

Your ceiling fan blades impact the quality and performance of a fan, though modern ceiling fans don’t tend to have many major differences in job performance. In fact, advancements in residential ceiling fan design, low drag blade shapes, pitch, and balance ensure your ceiling fans do their best job in your home. Whether you choose 3, 4 or 5 blades, you can rest assured that your ceiling fan will perform well in your home.

Fewer Blades for Less Drag

When a fan has fewer blades, there is generally less dragon on the motor. This means it can go faster and more air more efficiently. As a result, there is more airflow and a better wind chill effect. This makes your face feel cooler. Finally, the specific shape of the blades ensures that air is being picked up and moved around your home.

Do You Need a Breeze or a Gust?

A fan with fewer blades usually turns faster with a stronger motor. This creates a greater wind chill effect. If you are looking for a gentle breeze, you might need a fan with more blades.

How to choose the best ceiling fan

What size ceiling fan?

It might sound obvious but the basic rule is the larger the room, the bigger the fan required. For a small room (up to 20 square metres) fans with blades up to 122cm are ideal. For a bigger room, you’ll probably want to look for a fan with blades that are 130cm or more.

Take control

Generally, there are two options when it comes to controlling your fan. Either a wall switch with a dial to vary the speed, or a remote control if access to the roof and wiring is an issue

Three or four blade ceiling fans?

Most fans have either three or four blades and are made of either plywood, metal or plastic. The number of blades has no effect on their ability to cool a room but timber and plastic blades do tend to be a little quieter than metal.

Finish and colour

Another factor worth considering is how your fan is going to look within a room, as they can become a dominant feature. This is not too much of an issue if it’s going to be installed in an outdoor area, but for indoor fans it’s worth thinking about how it will complement your colour scheme and décor.

AC or DC ceiling fan?

Ceiling fans generally use either AC (alternating current) or DC (direct current) motors. DC models are becoming more and more popular because they are more efficient to run and use less energy than AC models. They also tend to offer a greater level of control, with up to seven speed settings available.

How to Install a Ceiling Fan

Before You Buy

To find the right size and downrod length of your new fan, measure the length, width, and ceiling height of the room you plan on placing it.

How to Install a Ceiling Fan on a Flat Ceiling

If you are replacing a ceiling fan with a similar style, installation should be simple. If you are putting in a new ceiling fan or replacing an existing light with a ceiling fan, make sure the power required to operate the fan will not overwhelm the existing wiring. Consult a contractor if you are unsure.

Turn off Electricity to Room

Turn off the electricity to the room where you are installing the ceiling fan. Confirm the power is off by flicking the light switches. Remember which switch controls the fan for testing purposes later.

Remove Blades

With a screwdriver, remove the blades of the existing fan.

Disconnect and Remove Fan

Unscrew the screws at the base of the fan where it meets the ceiling. Pull the cover down away from the wires. Remove the wire nuts and the connections between the fan and the wiring. The entire fan will come out of the ceiling so be ready to support its weight. Unscrew the brackets that support the ceiling fan.

Things To Know Before Buying a Ceiling Fan

Energy Savings

Ceiling Fans are great for improving room comfort while at the same time producing energy and cost savings. Homeowners are experiencing higher energy costs and it’s only going to get worse. There has never been a better time than now to consider the purchase of a ceiling fan(s)and to enjoy both the aesthetic as well as energy saving benefits of owning a ceiling fan. In summer ceiling fans allow you to feel cool without having to turn the air conditioning full-on therefore saving energy and money. Setting your thermostat higher with a ceiling fan running can save up to 40% on air conditioning bills. Studies show this can make a room feel up to seven degrees cooler. In winter ceiling fans should be reversed and used to push the warm air down from the ceiling to keep the heat in the lower part of the room. This is especially important in rooms with tall ceilings, resulting in energy and money savings from recirculating the warm air allowing one to set the thermostat lower.

Larger Rooms Need Bigger Fans

For maximum performance, choose the right fan to fit your room size. In a room up to 50 square feet, like a bathroom, choose a 29″ fan. Breakfast nooks and laundry rooms up to 75 Sq. ft. choose a 36″ blade span. Medium size rooms up too 100 square feet can fit fans from 36″ to 42″. Standard bedrooms and family rooms up to 400 square feet work most efficiently with fans that are 50″ or 52″. Great rooms or large areas over 400 sq. ft. require a ceiling fan with a 54″ or larger blade span. For long or large rooms, you should consider more than one fan to handle your cooling requirements. For maximum comfort, the fan should be placed as close to the center of the room as possible. Keep blade tips at least 18 inches from any wall. Ceilings Lower Than Eight Feet. Use the Ceiling Mounting Kit or go with a Snugger or Hugger model to achieve the desired seven-foot blade clearance.  For ceilings above eight feet, the fan should be hung by a downrod extension so that the fan is eight or nine feet from the floor. You will want to hang it at this level since the higher the fan is hung above eight feet, the less air circulates near the floor.

Bathroom and Outdoor Ceiling Fans

Look for a bathroom ceiling fan specifically designed and UL-listed for damp locations. Bathroom Ceiling Fans start at 29 inch blade spans since smaller rooms require less air movement and space is usually limited. Want one for the covered outdoor patio? Opt for an Outdoor Ceiling Fan that this is UL-listed for wet locations. Outdoor ceiling fans can also be used indoors. They have protective motor coverings to keep moisture from corroding the motor.

Fan Blade Pitch and Size

Fan blades determine the amount of air being circulated throughout the room. Fan blade pitch is usually between a 12-15 degree angle for optimal circulation. Fan blades must be weighted and matched as a balanced set to avoid having your fan wobble. Ceiling fans with less than a 12 degree angle will not circulate air as well and be less efficient. The greater the angle or higher the pitch of the blade the more air circulation you will have in your room.

The Motor

The motor is responsible for producing quiet operation while driving the blades for air movement. Look for high-quality motors with heavy-duty windings and sealed bearings that are permanently lubricated. Smaller, less powerful motors found on lower quality fans may produce higher operating temperatures, lower air circulation and noisier operation. Motors are designed to work flawlessly for long periods of time and should have a long lasting life

A Guide To Different Electrical Wiring Products

Common Electrical Wiring Questions

Whether you are a skilled electrician or an at home do it yourselfer, it is not unusual for you to have some common electrical wiring questions. These may come up in reference to a rewiring job you are doing or you may wonder if wiring is to blame if there are issues with the electrical equipment in your home. Whatever the case may be, here are some common electrical wiring questions and answers.

What do I need to know about appliance wiring?

This is a common electrical wiring question since homeowners often encounter an issue involving appliance wiring. Every appliance has an electrical connection and each specific outlet requires a certain breaker they need to be connected to. Some appliances, such as garbage disposals, need a simple 120 volt circuit breaker or single-pole circuit breaker. Others need a 240V feed that requires a double pole circuit breaker.

 How do I know if my electrical wiring connection is good or bad?

Some electrical connections are good…others not so much! Product manufacturers might give you a choice of connection points which include switches and outlets. You may be able to ascertain which will be the wisest choice by researching and using common sense. Whatever you do, beware of loose connections that can cause devices to heat up and result in an electrical fire. Create a safe and secure connection that will last a long time.

What do I need to know about electrical device wiring?

This is a common electrical wiring question as many homeowners may have issues that involve electrical device wiring. Like appliances, devices may need either 120V or 240V outlets. You need to be aware of which outlet your device requires. You should also know the proper way to strip, bend and tighten connections so that they are safe, secure and long lasting.

Why Aren’t My Outlets Working?

One of the most common reasons outlets stop working is that a GFCI (ground fault circuit interrupter) has been triggered. If your electricity accidentally gets rerouted the wrong direction or too much power is coming through your system, this breaker will be triggered. Go to your circuit breakers and see if something needs to be switched.

Why Is My Light Flickering?

A common cause of flickering lights is that your bulbs are suffering from a bad connection. This could mean that you need to screw your bulbs in better. It could also mean that you need to check for frayed wires along your line.

What About My Flickering LEDs?

LED lights have trouble dealing with the powerful alternating current coming from your walls. Often, they fall out of sync with your line and they might flicker. As technology improves, this problem will go away.

Common Electrical Problems in Your House: Harmless or Hazardous?

Harmless

Loose Outlet Plug

Turn off the breaker. Double check for voltage to the outlet (use a volt meter or plug something in). Unscrew the cover plate and add outlet shims until the outlet is flush with the wall.

Broken Light Switch

Turn off the circuit breaker (the light will go out when you choose the right one). Use a flathead screwdriver to remove the faceplate and a Phillips head to remove the light switch. Test the two wires connected to the screw for electricity. If it’s safe, disconnect and reassemble the light switch.

Simple Short Circuit

Some electrical appliances, such as hairdryers, can frequently trip or short circuits. Reset the breaker. Repeated occurrences with the same appliance indicate it’s the appliance – not the electrical system. Without the appliance? A short in the wiring or receptacle needs to be addressed by a pro.

Cut or Damaged Extension Cord

Unplug both ends. Cut off the old plug. Gently score and peel back the insulation jacket. Strip each wire with a wire stripper, twisting each wire tightly at the end. Screw them into the back of the plug: black to gold; white to the silver screw; green to the green screw. Then close the plug and secure the wires. Cut in the middle? Purchase extra ends and turn the damaged cord into two new ones.

Hazardous

Flickering or Dimming Lights

This could be a sign of a poor connection and can lead to eventual arcing – loose/corroded connections making intermittent contact that could result in sparking, overheating, and fire.

Light Bulbs Burn Out Frequently

If you’re experience frequent bulb blowouts, it could be more serious than overuse. You may have a loose connection in the socket or circuit. Recessed lights that frequently fail? Nearby insulation could be causing overheating and these fixtures are designed to shut off to prevent fire.

Dead Outlets

Dead outlets can result from a tripped poor connection (and possible arcing), or a tripped breaker due to excessive heat buildup resulting in melted wires or outlets.

Warm Outlets or Switches

Unless it is a dimming switch, warm outlets are as a serious safety concern and should be addressed by a pro immediately.

Frequently Tripping Breakers

Usually a sign the circuit is overloaded and using too much electricity. You should add a circuit or consider upgrading your electrical service.

Electrical Problems and Solutions

The problem is that the circuits fitted during older days were not designed to power different types of electronic equipment or lighting of this era.

There may be obvious signs of strains with more extension cords and single outlet paving the way to sprout power strips or lurking not seen at the back of ceilings, walls and cover plates.

So when considering household electric appliances, your safety is the main goal. If you are facing high bills, flickering lights and damaged appliances at your home, you can make sure the home circuit is not in a proper working condition.

Here are some common electrical wiring problems and their solutions

Electrical surges

It can be occurred due to poor wiring in the house or lightning strikes or faulty appliances or damaged power lines. Surges are common and last for a microsecond but if you experience frequent surges lead to equipment damage that degrade life expectancy particularly.

Check the device that connects to the home grid or the wiring and try disconnecting the poor quality powerboards or devices from the outlet. If the surges don’t occur again, your problem is solved. If it is not, you must call an electrician.

Overloading 

Sometimes your light fixture has a bulb or other fitting with high watts than the designed fixture. This is a code violation and the risk level is quite high. The high heat from the bulb can melt the socket and insulation present in wires of the fixture. This results in sparks from one wire to another and causes electrical fires. Even after the bulb is removed, the socket and wires will still be under damage.

It is always better to fit a bulb or any other fittings by staying within the wattage. If the fixtures are not marked with wattage, it is advisable to use a 60-watt bulb or even smaller ones.

Power sags and dips

 Sags are dips usually occur when the power grip is faulty and electrical appliances are connected to it. It also occurs when the grid is made of low-quality materials. When this is the case, it draws more power when switched on.

A junction box that is uncovered

 The junction box has lots of wires that are connected to each other. If it is not covered, a person gets a shock from damaged wire too. This is a code violation and the risk is minimal if the wires are not within the reach. Thus it is better to cover it with the screws provided.

Electric shocks

 When the electricity is not properly used, it results in electrical shocks with a nasty experience. The chances of such electrical problems in old homes were quite high because the circuits fitted during older days. An electric shock happens when you switch on or off a device. The issue can either be with the appliance or the wiring. To check the issue, you can test with another device. But to be on the safer side, just talk with your electrician to resolve the issues.

Electrical Wire Color Coding

Color coding is used both on the outer sheathing of bundled electrical cables and on the individual conduction wires within cables or inside conduit. Understanding this color coding can help you identify what the wiring is used for and helps maintain consistency within an electrical system.

Cable coloring relates to the size of the wires inside the cable and the cable’s amperage rating. For example, white-sheathed NM cable is used for 15-amp circuits, while yellow NM cable is rated for 20-amp circuits.

The coloring on individual conducting wires usually does not indicate a size or rating but rather the standard or preferred use of the wire. For example, black and red wires typically are used for current-carrying or “hot” connections, and white wires usually are grounded “neutral” conductors. Green-insulated wires and bare copper wires are used for grounding wires.

The Importance Of Commercial Electrical Maintenance

Essential Tips To Help Your Choose the Right Commercial Electrician

Electrical work in a commercial setting is different and distinct from domestic electrical work, and therefore requires an experienced electrician. Correctly functioning and safe electrics are essential to your business, workplace, warehouse or store, so choosing the right commercial electrician is key.  A high quality commercial electrician can not only be useful to establishing functioning electrics at your business or workplace, but can also be an essential business resource to keep you up and running when electrical faults arise. Here we look at 6 of the most important things to look for when choosing a commercial electrician, so you can make the right choice for your business.

Choose An Experienced and Knowledgeable Electrician

Because commercial electric work can be both unique and complex, it’s important to work with an experienced and well trained electrician for commercial projects. Commercial electrics is much more than just domestic or residential electrics on a larger scale, it is a completely unique system with its own features and nuances. To ensure the highest quality result, and safety for you and your business, always choose a fully trained, experienced and knowledgeable commercial electrician. Ask your electrician about their commercial experience and training, as well as whether they have proper licensing. This ensures you work with the best quality commercial electrician and always receive high quality and reliable results.

Can They Meet Commercial Demands?

It is essential that your commercial electrician is able to meet the demands of commercial electric work both in terms of knowledge and practical capability. Commercial electrical work requires the versatility to excel in rapidly changing and diverse settings, and the flexibility to work well with both the design and installations as well as repairs and maintenance. A good commercial electrician should also be able to work with a team of construction professionals on a project, so it may be advisable to check your electrician’s past experience, particularly in terms of communication and working with others.

Confirm Licensing and Insurance

Of course, when choosing a commercial electrician, it is absolutely essential that they hold the proper licensing and insurance for the work they will undertake. Choosing a licensed electrician means you avoid being liable for paying worker’s compensation if the electrician accidentally suffers any accident or injury on the worksite. Likewise, electrician insurance provides coverage to pay for damages if something goes wrong, while bonding (another form of insurance) provides coverage if your electrician disappears before the project is completed.

Check Reviews and References

You want to learn as much as you can about your commercial electrician before your hire them, to ensure you’re making the right choice. While word of mouth and recommendations were previously the best way to learn about an electrical contractor, now with online reviews, websites and references, you can easily learn even more about your electrician’s past projects, their client’s reviews and work portfolio. Check online reviews of your electrical contractor’s commercial work to assess how they completed their projects in the past. To get more specific feedback, you can also contact your commercial electrician directly to ask for references from past commercial projects that are similar to the current project you are undertaking. This can allow you to get a clear idea of the way your electrical contractor works on commercial projects and even give you the chance to speak directly with a past client.

Ways to Choose the Right Maintenance Electrician for Your Commercial Business

As we enter the digital age, more and more of your business relies on high-quality electrical systems. When looking for maintenance electricians, especially for emergency situations, it is important to choose reliable, professional tradesmen. But how do you find the right electrical services?

Scope of work

Whether you are up for a refit, moving offices, or needing repairs, commercial electrical work is a complex sector of the electrical trades industry. Once you have contacted a likely choice, make sure to explain clearly what your expectations are of the job and the available budget. Ask to be taken through what approach they would take. An experienced electrician should be able to identify potential issues, outline likely parts required and get a rough timeline of the works.

References

The internet is a valuable source of information when you are looking to hire commercial trades. Check out Cablewise’s Projects page here for a gallery of delivered jobs across the Perth metropolitan area. Past project galleries are invaluable for ensuring the electrical services you need to match the expertise of the specialities of your short-listed electricians.

Quotations

When making contact and asking for a quote, there are a few things you can be aware of that help you determine the professionalism of your likely electricians

Nothing is worse than trades that don’t meet commitments or deadlines. Whether they have taken on too many jobs or are simply disorganised, quality organisations like Cablewise take great pride in being on time, every time.

All electrical work in WA requires certification of tradesmen who are required to hold a current electricians license. It is important for safety that your hired tradesmen carry the appropriate licence for the job.

Just like your business, your electrician should have public liability and business insurance. These details should be provided when asked for, you don’t want to be unprotected when works are underway.

Service quality. In the electrical trade, service is not limited to the end result. A professional job takes into consideration time, minimises disruption to your commercial activity and respond to queries promptly.

Time required. As part of a quote, you should be presented with a likely timeframe for works to be completed. This can vary depending on the size of the electrical team, speciality equipment necessary, and the experience of completing similar projects in the past.

How to Choose The Right Commercial Electrician

Do you need some urgent electrical work done at your workplace? Here are 6 essential tips to help you choose the right commercial electrician in Calgary.

Professional and Licensed Commercial Electricians in Calgary

At Fluorescent Man Lighting, we have a team of highly qualified, licensed residential and commercial electricians who have the expertise and equipment to meet your lighting needs quickly and safely. Whether you require an installation, repair, or replacement, we can help get you back up and running in no time!

Choose an Experienced Commercial Electrician

Electric work in the workplace tends to be both unique and complex, which is why it’s so important to work with an electrician who is well-trained in commercial projects

Confirm Licensing and Insurance

Whenever you work with a commercial electrician, you MUST make sure that they have the correct licensing and insurance for the work they’ll be undertaking

Ensure They Have Good Communication and Teamwork Skills

Unlike residential electric works, commercial construction projects typically involve a number of different professionals working together to achieve a common goal. This means that it’s crucial that your commercial electrician is able to communicate effectively and work harmoniously with other building professionals to produce the outcome you want.

HOW TO CHOOSE THE RIGHT COMMERCIAL ELECTRICIAN FOR YOUR BUSINESS

Experience

Commercial electric work requires experience. Check your electrician’s experience and knowledge with commercial electrical work. The more experienced your electrician is, the more knowledgeable they will be with complex projects.

Resources

Does your electrician have the internal resources and team to meet all your electrical needs? Don’t settle for a one-man band. A good commercial electrician should have a team of well trained professionals.

Communication & Cleanliness

You’re running a business, so you don’t have time to waste. Make sure your electrician communicates well and is able to liaise with other contractors who may be on site too. While your electrical work is important, you need your business to continue running. Your commercial electrician should understand this, and make an effort to keep their work area clean and tidy for you.

License and Insurance

It goes without saying that it is critical that your electrician should have proper licenses and insurance for the work they perform. In the unlikely case that there is an accident on site, you will be assured that your electrician is covered.

Client Testimonials

Always take the time to ask a potential electrician for some previous client details. A reputable electrician will welcome you to contact their previous clients so you can ask some questions. If your electrician refuses to let you contact previous clients, or avoids the question, you should start looking for a new commercial electrician.

Tips to Consider When Choosing a Commercial Electrician

We often work with companies who turn to us after having a negative experience with their previous electrical contractor.  Commercial work requires expanded knowledge, skills and resources.  There are several things to keep in mind when choosing a commercial electrician.

Availability

You want a 24/7 electrician available to handle any needs that may arise.  For instance, a retail establishment may need to call a 24/7 electricians to come out on Black Friday to resolve an issue.  A restaurant may need access to a 24/7 electrician  to address electrical problems with equipment. Not having ready access to 24/7 electricians can cost a business thousands of dollars in lost revenue.

Knowledge and Ability to Meet Any Commercial Demands

When interviewing a commercial electrician, he or she should request a tour of the building, office, warehouse or facility where they will be working.  A good commercial electrician will scope out the area and be comfortable working in all types of environments.  They should also be able to not only perform repair work, but installations and maintenance as well.

Licensed and Insured

Ask any electrical contractor you are considering for their license and insurance information.  If they are unable to produce it, then move on to someone else.

Good References

Don’t be afraid to ask any commercial electrician you are considering for references.  You can also check online reviews for practically any electrical contractor these days.  Be sure to take a good look at their experience and background

Solar Energy Powered Outdoor Electrical Lighting Solution To Power Shortage

TIPS FOR CHOOSING OUTDOOR LIGHTS

Equally, the different forms of lights are suitable for specific placement. For instance, wall sconces for exterior walls, low-level path lights on stairs, floodlights on driveways, and string lights on patios or gazebos. In general, though, you need to have a single priority in mind; have a good idea of what you want to accomplish with your outdoor lighting so that you can pick the right lights for the correct location

The location or placement of your outdoor lighting should go hand in hand with the purpose of the fixture. Before you make any purchase, you need to be clear on its intended use. For instance, wall sconces and lights will help to improve the visual attractiveness of your outdoor area, while security lights and floodlights will help to improve the safety and security of your home.

It’s common for people to shop outdoor lights based on visual elements such as style and finish. While the design of the fixture is a good place to start, another area of equal importance is the size. Here, we are referring to the size of the fixture in proportion to your house. For instance, a fixture can appear gigantic and vibrant in a showroom, but when mounted on your entryway, it suddenly looks small and insignificant.

When choosing your fixture, you want something that will match the existing style of the space or complement the surroundings it will be added to.

Motion Sensors

Motion sensors are triggered by movements, making them ideal security lights for walkways. Also, their brightness over a large area makes them ideal for lighting the entryway into your home.

Outdoor lighting buying guide

Stay safe and have fun with our garden lighting options

Enjoy your garden after dark by introducing some outdoor lighting. It not only helps you move around your space safely, illuminating paths and changes in level, it can also help create an atmosphere for socialising or dining. Be it for fun family parties; romantic, intimate dinners or quiet, relaxing time alone. And with such a range of designs on offer, garden lighting can become an attractive feature to complement contemporary or more classic garden styles.

What area do you want to light?

The area in need of lighting often determines what lighting type would work best in this space. So, if you’re looking to light up a path for example, this would require navigational lighting that helps people stay safe and easily follow the route, rather than a decorative alternative that might only illuminate a portion of the path. So, have a think about your space and how you use it to shape your lighting design.

Do you want your lights to be portable?

When it comes to whether or not you can move your outdoor lighting around, power source plays a large part. Fixed, electrical lights need to be connected to the mains making them the ideal choice if you want lighting close to the house. Whereas candles, battery or solar-powered lighting have no restrictions and can be moved around as, and when, you like. So, if the area you want to light is a distance from your home, or you want to be able to adjust your lighting based on what you’re doing, choose one of these options.

Electrical lighting

Mains power provides consistent and uninterrupted lighting which will burn brightly and for us long as you want it to. Being a permanent fixture, it has to be fixed into place and be properly fitted.

Solar-powered lighting

Solar-powered lights don’t need any wiring as they store sunlight energy in a battery, which is activated once the sun goes down. Due to improvements in technology, solar lights are now more powerful and last longer than they once did, so there’s no need to buy any to keep in reserve or worry about whether they’ll last into the night.

Vital Things to Consider When Choosing Outdoor Lighting

When it comes to considering lighting up our homes, we often give priority to interior light fixtures like table lamps, chandeliers, recessed lights and standing lamps but we don’t put too much effort into selecting the outdoor lighting. This is because we use the interior areas of our abode more compared to the outdoor areas.

Nonetheless, the outdoor lighting is equally important for your home just like the interior lighting. That’s because the outdoor lighting illuminates the exterior and helps in providing better vision at night to the entryways, walkways, and pathways. Moreover, choosing the right outdoor lighting also adds beautiful accents during dusk and nighttime while letting you transform the backyard, lawn, or garden areas of your house.

Go for big fixtures but not too big

We understand that you have a large space outside your house, and you can surely add large lighting fixtures but in most cases, putting up “too big” outdoor lights ruins the look of your house. For instance, you don’t want to fix large lighting fixtures that block the doorway. Here, you need a fixture that will only go about a quarter of the doorway. You can use large fixture (if you are only using one fixture) otherwise, medium ones are way better since they won’t look over-the-top and only provide lighting in a focused area

Color of the lighting fixture

Just like the indoor lighting, you’d not want to clash the color of the lighting fixture with your walls. Instead, lights must complement the look of your exterior walls and the landscape. Quality lighting fixture makers offer you different resources that can help in creating a landscape that can complement with most attractive lighting installations. Just like landscaping and perfectly timed lawn care, the right fixture can indeed enhance the entire look of your house.

The style of your home

It is important to consider the overall style and look of your home before you head on shopping for outdoor lighting. If you have Cape Cod kind of style, the mission style fixture will not look good. Carriage style lighting may be too much for an English bungalow. So, pick outdoor lighting that matches the style and the color of your home.

Landscape Lighting Guide

Landscape lighting can be the thing that takes your backyard from basic to bling, but undertaking a lighting plan for your yard can be an intimidating project. But have no fear, as this need not be the case. Welcome to Landscape Lighting 101, where we’ll walk you through a basic overview of the various types of lighting you’ll find in a landscape and exactly what each of them is supposed to do

Like many things in life, less can be more—and this is the case when it comes to landscape lighting. Your instinct might be to light up everything: every detail, every tree, every nook and every cranny. But besides potentially running up your power bill, this will wash the yard out.

What makes a space special during the night is the play of light and dark, highlighting features that you may not take note of during the day and creating contrast and shadows using the forms and plants in your yard. Playing with these elements creates intrigue and drama, and a well-lit space will often be one in which you want to stay.

What to Light In Your Landscape

So what do you light and what do you leave in the dark?

Identify the features in your yard that you like. Maybe it’s a pond or a particularly stately tree—highlighting those with light will show them off.

How To Choose Landscape Lighting

Outdoor living spaces are becoming an integral part of how we live and increasingly an extension of our indoor spaces. Homeowners now have a multitude of landscape lighting options for illuminating their gardens, walkways, patios, and decks.We spoke with Douglas Prexta, sales manager of landscape lighting at Hinkley Lighting, and Scott Sorensen, vice president of sales at BEGA, about key considerations in selecting landscape lighting.

Douglas Prexta: It enhances the beauty of your surroundings—objects, fountains, architecture, and landscaping—after the sun goes down and increases the value of your home. It expands your outdoor living space and adds hours to your outdoor activity. Also, creating illuminated architectural features like walkways, driveways, steps, decks and stairs can ensure safe passage from one point to another while adding security.

Are there any trends driving landscape lighting today?

DP: LED has changed the industry dramatically. The main disadvantage with low-voltage products in the past was voltage drop: the flickering that results from resistance in the circuit. However, with most high-quality low-voltage LED fixtures, the voltage drop concerns have virtually been eliminated, basically allowing for plug-and-play installations.

What are basic rules of thumb to keep in mind when choosing landscape lighting?

DP: Work with a knowledgeable designer to lay out and install the lighting. Remember, you are making investment in your property with professional-grade product.

What should one know about different voltages and using electric lights outside?

DP: Because low-voltage landscape lighting is typically 12-24 volts, it’s easy to work with and doesn’t require a conduit (unless passing through a building or structure). Line voltage, by comparison, requires professional installation and is much more labor-intensive and expensive. All low-voltage lighting needs a low-voltage transformer to reduce 120-volts to 12-volts, and it must be plugged into a GFCI (ground fault circuit interrupter)- protected receptacle. If you are unsure about the installation, consult a licensed professional.